

3 Ways To Improve Your Images
- Jul 31, 2019
- 12 min read
PHOTOGRAPHY EDUCATION | CARIBOU COUNTY FAIR- GRACE, IDAHO

My goal with this article is to give you a few more tips and tricks to help you take images that you love and WANT to print and share with others! Let’s face it having hundreds of images just sitting on our phones isn’t doing much good! So let’s get to it!
3 Ways to See Improvement:
#1- Composition
#2- Light
#3- Design
Easy enough right! But since those three words alone aren’t very helpful, let me explain a little further...
#1-COMPOSITION
This is the way you set your image up- the technical aspect of a photo.

RULE OF THIRDS
In photography we use a rule called the RULE OF THIRDS. By definition, this is breaking an image/frame into nine equal parts using two vertical and 2 horizontal lines. The theory is if you place points of interest (your focus/subject) along one of the lines, your photo becomes more balanced and will allow a viewers eye to interact more naturally! GREAT! Now you know what it is, but how do you use it?
First off, decide what your focus is. Your child, a flower, whatever it is, place the main point of the subject on one of the lines or on one of four intersection points. For example, in the image below, my cute husband & little boy are standing along one of the vertical lines- in just a third of the image. If you want to fill your whole frame with a flower, place the center of the flower on one of the intersection points for more impact. You’ll see a few examples of this rule used below.
Keep in mind you can still place your subject smack dab in the center, but be purposeful with it! Switch up your layout and you’ll find the rule of thirds is an easy way to make a statement!


CHALLENGE: Watch TV or a movie. Strange request I know! But you will start to notice the rule of thirds is used frequently! I have a hard time finding shots when the rule of thirds hasn’t been used!
QUICK TIP: On apple products ie. iphone, iPad etc. Under your settings-camera you will find
the option to turn on your ‘GRID’ this will display a grid over your screen each time you take a photo to help give you a guide to follow! I have this on my own phone and I love it! Android devices have this option to under settings when the camera is activated.
FOCAL POINT: Focal points are the places we want the viewer to look first. Whether it’s someone’s eyes, or the petals on a flower etc. It is the main ‘point’ of your image. Play with the rule of thirds and place your focal point in different thirds- test it out and see which look you are most drawn to!

QUICK TIP: At least at our house, we are in such a hurry to snap an image that I end up with A LOT of blurry images on my phone (Thank You Mercedes!) Take the time to HOLD STILL until you hear a click/capture sound. On apple products, you can tap your screen to ’lock focus’ on your focal point. Android appears with a a box you can touch to lock focus.
Lastly in Composition is perspective. Perspective being the many different ways you see the same image, but from different view points. Example, you take a photo of your child painting from a traditional view. But then maybe you get closer and stand above her to show a looking down on her view. This can be a fun way to break up the ‘norm’ and create interest!With landscape images, a great way to show the ‘whole picture’ and the great vastness you are experiencing is to place the horizon line on the bottom or middle ’thirds’ line to show the sky, the horizon, and what lays below it!


ZOOM: Zooming in and out has it’s purpose and times where it is handy to use! But rather than using it by default to capture an image, pick up your feet and move in closer or further away from your subject. Clarity of an image is decreased greatly by using the zoom feature especially on our phones & tablets.
I am not suggesting you move closer to the Bison in Yellowstone! At that point, the zoom feature would be very handy!;)

QUICK TIP: When shooting tall buildings, with not a lot of space to move around, squat down low and shoot up. Example a small temple like Brigham City. Normally you would need to go across the street to the front doors of the tabernacle to get the whole temple in your frame. It still works great, but you can also get some neat views of the temple by backing up and squatting down!


CHALLENGE: When you take an image I want you to look for at least one other view point you can capture like the different view of your child painting...
Now that the technical side is done...next up is LIGHT!
#2- LIGHT- Light is a powerful resource. You can have perfect composition, fantastic subjects, but without a good source of light, you will still find your image lacks something.
There are two types of light. Hard vs Soft
Hard light creates a lot of shadows, dark eye sockets, really bright spots yet also really dark spots. Basically the light doesn’t fall evenly on your subject. But if you like a very contrasty look, then you’ll like hard light. Hard light is what you will normally encounter around
12-2 pm outdoors (the sun is high in the sky and the most powerful).
Soft light is my favorite! It looks beautiful on faces, or whatever subject you choose. Soft light can be found during the Golden Hour- if you‘re photographing outdoors. (I’ll explain the Golden hour later)
Below is a great example of Hard vs Soft light.

Stock photos
FIND YOUR NATURAL LIGHT SOURCES
You will find great success when utilizing soft light! Look around your home. Find an area that has windows (even if it’s just one), or doorways. These are going to be your prime spots for photographing in. My favorite place in my home in my front room. There are light colored walls- which enhance the ‘brightness’, I have a front door and a window. The other place I use is my kitchen- a backdrop that can be opened, a large window and light colored walls. The only problem I run into at certain times is my old orange colored oak cabinets. Sometimes they cast an ‘orangey’ look in my photographs. When you find that sweet spot in your home, you’ve found yourself a great resource!

How about outdoors? A shaded porch, garage doorway, shaded tree, the shade of a building can all give you ‘diffused’- soft light. Although if it’s overcast, you have a prime day to take a photo! The light is already soft because the clouds are blocking the powerful sun rays- utilize these days!

There is a common misconception that the brighter it is outside, the better results you will have. This isn’t necessarily true. Yes at noon you may have the most powerful and vibrant light, but it is just that- TOO powerful and vibrant!
When you are indoors, be aware that if you have a really bright hot spot on the ground coming from your light source- window or doorway, you want to do one of two things. One, wait until there is still light coming through the window, but not making a bright light spot on the ground, OR place your subject further away from that hot spot (it can still be near it, just don’t put your subject IN that hot spot.)
COLOR REFLECTIONS
Earlier I mentioned my orangey cabinets causing a problem. This is because of reflections.
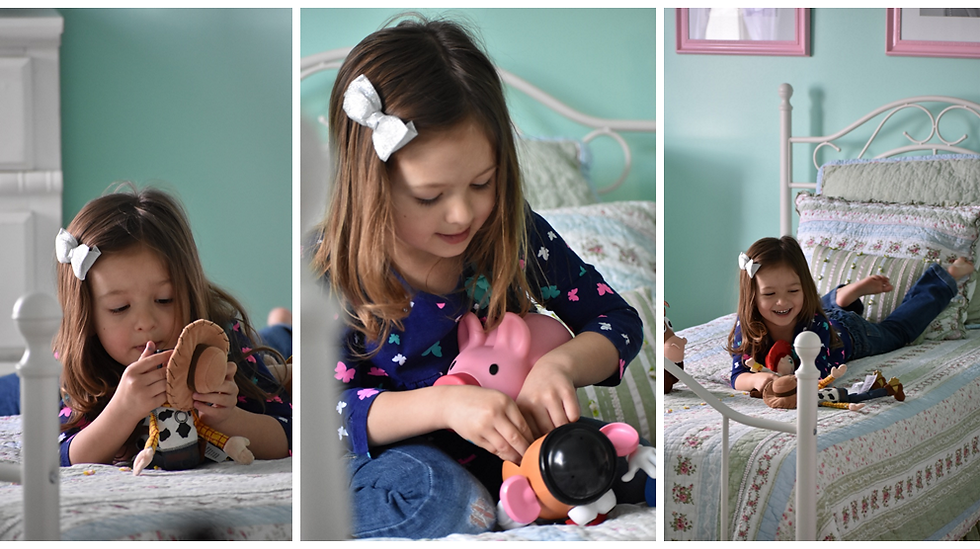
Color reflects! Some more than others but it’s something to be aware of. In my bedroom, I have light colored walls, two windows- providing a great light source, white furniture and light colored carpet. It sounds ideal, and it would be except for one problem. My sage green bedspread often sends a green cast throughout the room making my images have a greenish tone. I could solve the problem by taking off the bedspread, it just depends on how outgoing I want to be!
Another example pertains to the image below. It was Mercedes birthday and I thought her room would be the perfect backdrop! She had a beautiful teal room (with glitter in the paint!), beautiful sheer curtains and a window. Sounds cute right? Well Craig came home with a $30+ bunch of pink, teal and white balloons, and we set the shot up. Everything was perfect until I looked at the images. Mercedes had a grayish blue tone to her skin. It didn’t look natural! How could this be? The four teal walls were reflecting their color onto her skin giving it an ‘off’ look. This is what color reflections can do! Have you ever noticed when you wear a white shirt, you pick up the colors you are standing near? Like a a red building, or a blue wall, it may be subtle, but it‘s still there. Watch for this when you are under the shade of a tree, you may have to step a little closer to the edge of the shadow to avoid a real green cast!

TIMING
There are ‘prime’ times to photograph. This is what we call the Golden Hour. The Golden hour happens an hour after sunrise, and an hour after sunset. If you’re curious when those two times would be, check the weather channel app, or website for daily, weekly and monthly times! It will be in the weather details!
If I have a choice, my favorite is to photograph in the evening just a hair before sunset and up to an hour after. Another favorite- overcast days!

QUICK TIP: In most cases- unless it’s overcast or your in the shade, you will want to face your subject (people specifically) to the east if it’s afternoon, and generally west if it’s in the morning. This will put the sun behind your subject and provide a back-light situation- giving you that glory halo around your subjects frame- body.
ANOTHER QUICK TIP: There will be those times where you really want a picture and it’s not ‘prime time.’ For example you’re on vacation and want to snap a photo but it’s noon. Bummer right? The best trick I can give you is to have your subject face their shadow. It wont always be ‘perfect’ but it will give you a better image than squinty eyes, and dark shadows!
LAST TIP: If your indoor lighting is anything but ‘natural’ light (I’m talking about your light bulbs) then I suggest turning off the lights. Just use your natural light sources! Otherwise just like the orangey cabinets, you may end up with an orangey looking image. I also avoid using the flash. It doesn’t give natural results in most cases!
#3- DESIGN
CLEAR THE CLUTTER: You’d be surprised how clearing your background of distractions, and unnecessary objects can clean up your image! It’s a way to refine your image! Look for things like toys, garbage, maybe dishes and/or remotes. These things oftentimes don’t need the spotlight!

SIMPLICITY: I’m always so excited to add lots of elements to my images- for example mini sessions, with tons of props and such. Yet in the end, my eye is always drawn to the more simplistic looks. Maybe a handful of floral's, maybe a simple blue wall and wood floor. Something about a simple look brings my eye in to focus on the subject in the photo! Try it! Besides, it’s way less stressful anyway!

TELL A STORY: Like I mentioned in composition. Sometimes we just need to switch up our perspectives to tell a bigger story. My daughter loves to garden, she loves the flowers, loves playing in the dirt- as longs as she can wear her gloves, and loves showing off her flower displays. One day she was out on the porch planting a flat of flowers when I realized this would be the perfect time to tell a story! By getting up close with the dirt on her toes, or her cute pair of gloves and shovel, I was able to tell a story in just a few images and no words! Pay attention to those fine details I can guarantee you will be able to recreate a moment in just a few images!
Photography is a fantastic way to tell stories, it is a visual way to record our lives! A journal of sorts!

OTHER TIPS & TRICKS
-When photographing children & pets you have a very limited window of attention time. Decide first where you are going to shoot, make sure your light looks great, and everything is how you envisioned before you bring in the kids and pets!
- If you’re having a hard time getting kids attention, give them something to hold, like a blade of field grass, a small bouncy ball, just something they can hold onto. I will be the first to admit I bribe my kids every now and then with suckers, smarties and other simple treats!


- Get down to their level. With kids, I love to get down on their eye-level. It seems to get their attention better than standing above in the beginning! But don’t worry, I switch it up when I can for a variety of perspectives!
- The best way to get a natural smile out of a child is to make them laugh. I had one family that was not comfortable behind a camera- which is common! But for some reason when I said ‘boogers’ they would all burst out laughing and we captured some fantastic & natural smiles!
- CLEAN YOUR SCREEN & LENS!
I can’t tell you how many times I have got to snap a photo only to be discouraged that my imaged looked blurry! I thought for sure my lens was broken! (Those can run between $300-upwards of $1,800 or more!) When I get looking closer I realize my screen and lens are dirty! Especially when it comes to our phones- they aren’t just for picture taking! I love Nikon’s Universal Lens cleaning wipe. They are cheap and can be used for eye glasses, camera screens & lenses! They are one time use, but are small enough to throw in your purse or pocket!
I purchase my Nikon Wipes on Amazon.
-POSING
Children- I love to give them some way to interact with each other- for example have them tickle each other, or give hugs, and/or kisses. They love it, and it looks natural!

Guys- By far the easiest to pose! Hands in pockets, or hands in pockets with thumbs out. They naturally stand- and even walk this way! It’s easy, quick and natural!

Girls- Hands on hips, with a little pop (bend) in the leg closest to the camera is always a great staple. One hand on the hip, one down and leg popped is another great option. Lastly one hand in a pocket- front or back, and the other hand lightly playing with or holding a strand of hair. These are all easy, and give a great result. It shows off her curves and keeps her from the ‘blob’ look!

-EDITING
Sometimes you may have an image you’ve taken and you just want it to be a touch bit brighter. No problem! There are a lot of FREE editing apps you can put on your device. I will be honest, I don’t do a lot of editing outside of brighting, straightening and cropping an image. I love natural looking images!
But maybe you want a more ‘moody & contrasty’ look like you see on Instagram. That can be achieved through presets or filters. Instagram automatically gives you those options when you go to post a picture. Editing apps also offer a variety of different looks for your to choose from! I personally do not use filters/presets, but I know they are very popular right now!

Here’s a small list of the top 5 FREE editing apps. My favorites are Lightroom, and Adobe Photoshop. I have the full versions of both on my PC. They are user friendly and quick!
EDITING APPS:
5: Carbon:(Black and White Images) iPhone
4: Snapseed: Android/iPhone
3: VSCO Cam: (Similar to Instagram’s basic editing but the advanced version) Android/iPhone
2: Adobe Photoshop Express: Android/iPhone
1: Lightroom CC: Android/iPhone
WHEW! Have you taken all of this in? I know it’s a lot of information but pick one aspect for example Composition, and start there, then when you feel confident in your composition, add on your next building block! I promise you will catch on, it just takes practice!
In the end, I hope this information is helpful to you. If you have questions or need clarification, feel free to contact me! I’m happy to help!
(There is a contact tab at the top of my menu, submit your questions through then link provided or email me at mikennaatkinsonphotography@gmail.com
I really enjoyed scrap booking as a teenager, but the moment I had kids it became unrealistic! But there are other ways to organize your history! Over the years I used Shutterfly, Walmart, and Mixbook to create and print hard bound photo books for each of my kids, as well as a family yearbook. I love them! I will often find my kids sprawled out on the floor flipping through the pages giggling. I also love that they are light weight instead of 20 lbs for a 3 inch binder...
Recently I have found a love for a new company- MPIX. They are a sister company to my professional lab I use for clients prints. Their quality is amazing, and I love how quick their turnaround time is! I suggest getting on MPIX email list. They will send you some great discount codes, and a few times a year I can get my books printed for 1/2 off! I can guarantee you’ll love the quality! MPIX offers a variety of print options like calendars, photo books, canvas & regular prints, ornaments etc!
Their website: https://www.mpix.com/

Happy Snapping!
-Mikenna
P.S. Just for fun, here's a 10 day challenge for you to help practice the different concepts!

Comments